How to… :  …Goods Invoices Control : Configuring goods invoice control

Configuring goods invoice control
Introduction
This “How to” describes the configuration process for the components required by DDS Shipper Import/Export web application’s goods invoice control utility:
-
-
-
-
-
-
-
-
-
-
-
-
Setting up the menus
Back Office / Web2 / Menus
Declare menus as follows.
Make sure to copy the exact contents of the “Menu code” and “Associated site name” columns.
Setting up the navigation screens
Back Office / Web2 / Navigation manager
These screens contain functionalities that are required to use the module.
Declare navigation screens as follows
Make sure to copy the exact contents of the “FILENAME” and “LEVEL” columns.
Use the Tab Name column to name the menus in pages headers,
The Step column lets you name the screens’ “tabs”.
Setting up authorized statuses by user profile
Back Office / Web2 / Grant
Configuration prerequisite: user profiles exist and have been declared in Back Office / Location and data entry help / general data / sealing party / user type definition.
Once menus and navigation screens have been declared, the user must define user profiles’ rights of access to each menu - modification or read-only.
These rights may depend on the statuses defined in the business analysis process.
What is shown here is the standard configuration where all modifications are allowed.
Select business profile to configure
Check menus accessible to profile
In zone “3” Menus/Profile, check “Right of Access" flag for the menus that are relevant for Goods invoice control:
Add entities for each menu
For each menu click on the relevant menu, select zone “4” Entity / Menus / Profile and right-click to add line.
Select the appropriate entity
Save
Assign statuses to entities
For each new entity, select the entity and select zone “5” Entity visible status.
Right click and select the appropriate entity.
Save
Individual standard zone configuration summary for goods invoice control
Right of Access
Right of Modification
E.g.: A user for whom right of access to “DSI_CFC_GIN_NEW” is unchecked will not see “New w/o provision” displayed on Web.
2nd example: a user for whom right of access to “DSI_CFC” is unchecked will not see the corresponding menu displayed nor its submenus.
Setting up goods invoice control’s standard reports/printouts
Goods invoice control includes 3 standard dedicated report/printout templates:
-
-
-
-
-
-
-
DDS Logistics provides Data Windows Designer software training to clients who wish to have custom templates (with logo, specific information and so on).
Enable credit note/added invoice request
Back Office / Maintenance / Advanced Print Code / Edition DDS_AVOIR_MCH
Open DDS_AVOIR_MCH detail
Double-click on a line.
Enable the standard edition
The print template’s standard configuration in the advanced print code form should look exactly as follows:
Make sure you check the "Active" box.
Save
Customizing the credit note print template
Back Office / Maintenance / Preference / Table
Add a line named DDS_AVOIR_MCH
Specify new print template code
This code, which is entered in the “Description” column overrides the standard code.
Save
Using the credit note/added invoice request print template
There are two methods to access this template:
Open the “provision list" screen
Provisions Criteria / Provisions List menu
Select a provision line
Click on Asked Credit Report button
Alternatively, open one of the list's invoices
Click on the “Invoice reconciliation” button
The user can choose to print the credit note/added invoice request.
Print preview
Click on Yes to open the preview window.
The edition will be displayed, based on ONE printout per order, supplier, currency code.
This means that in the case of an order with several batches that would all be impacted by PA2 with newly created credit notes or added invoices, the preview will show all related credit notes and added invoices.
Select and print document
Enable goods invoice list
Back Office / Maintenance / Advanced Print Code / Edition DDS_FAC_MCH
Open DDS_FAC_MCH detail
Double click on a line.
Enable print
The print template’s standard configuration in the advanced print code form should look exactly as follows:
Make sure you check the "Active" box.
Save
Using the goods invoice list print utility
Open reconciled invoice list
Invoices Criteria / Invoices list menu
Open template management window
Click on the “Print" button. The list of print templates available on this screen is displayed.
Preview print
Select relevant document and click on the “Preview” button to open preview.
There is no standard multiple criteria edition uriliry for this document template.
The preview will show the results matching the criteria entered in the reconciled invoice search screen.
To make the most of this print template, the search criteria should be carefully chosen.
If there are fee invoices, the document will be spread over several pages provided the search results are not filtered according to a specific supplier.
1st example: 2 different suppliers, invoices with PAs (=goods invoices for fee only invoices).
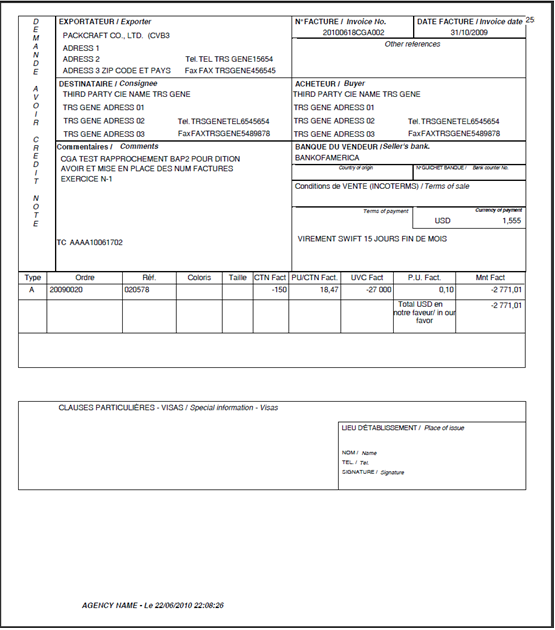
1st page For goods invoices (with and without fees) of 1st supplier,
2nd page for second supplier’s goods invoices
3rd page for fee only invoices (no PA code) of 1st supplier
2nd example Single supplier, single currency search
3rd example: Single supplier, multiple currency search
E-mailing the document
To e-mail the report as a PDF attachment select its code and click on the "Mail" button.
A new Write e-mail window will open.
Choose recipients and compose e-mail
When the recipient(s) have been selected and the message (if any) is composed .
Send message
Click on the “Send" button.
Enabling detailed goods invoice list
Back Office / Maintenance / Advanced Print Code / Edition DDS_FAC_MCH_D
Open DDS_FAC_MCH_D detail
Double click on a line.
Enable print
The print template’s standard configuration in the advanced print code form should be exactly as follows:
Make sure you check the "Active" box.
Save
Using the detailed goods invoice list editing utility
Open reconciled invoice list
Invoices Criteria / Invoices list menu
Open template management window
Click on the “Print" button. The list of print templates available on this screen is displayed.
Preview
Select relevant document and click on the “Preview” button to open the preview.
There is no default multiple criteria edition utility for this template.
The preview will show the results matching the criteria entered in the reconciled invoice search screen.
To make the most of this template, the search criteria should be carefully chosen.
The system creates one page per reconciled invoice.
E-mailing the document
To e-mail the document as a PDF attachment select its code and click on the "Mail" button.
In this case a Send report by e-mail type of window will open.
Choose recipients and compose e-mail
When the recipient(s) have been selected and the message is composed.
Send message
Click on the “Send" button.
Declaring fees related to goods invoices
With the goods invoice control module it is possible to declare fees that correspond to charges or credit notes that will be included in the goods invoice.
These fees are added manually in the “fee” tab, which is made available when goods invoices are reconciled.
The amount of these fees may be a percentage applicable to the amount of the products invoiced or a set amount (flat rate).
We will be dealing with the following topics:
Declaring the fee families in use
Back Office / legs and transport schemes / parameters / family
Fees are always attached to families in DDS Shipper.
Two types of fees are used for goods invoice control (except D&A/RRR and cash discount/ESC)
Display the family list
On the family screen, click on the Search button.
Create “G" and "H" codes
Right-click and select "Add row".
The family with “G” code will include fees of "credit note" type that will be deducted from the total amount invoiced.
The family with “H” code will include fees of "charge" type that will be added to the total amount invoiced.
Declaring the fees in use
Back Office / legs and transport schemes / parameters / fees
Once “G” and “H” fee family types have been created, it is necessary to create the fees that will be available.
Display fee list
On the fees screen, click on the Search button.
Create a new fee
Right-click on list and select “New”.
Enter fee data
The mandatory data are:
Useful data to better use these fees:
Discounts and allowances (D&As/RRR)
D&A (RRR) management is enabled by declaring a fee of “G” type.
But they have a (hard coded) fee code that is always “RRR”.
For this particular fee there are specific management rules which depend on whether the RRR fee is attached to a product invoice or not.
Please refer to the “how to” on D&A/RRR uses.
Cash discounts (ESC)
Cash discounts (ESC) management is enabled by declaring a fee of “G” type.
But they have a (hard coded) fee code that is always “ESC”.
There are specific management rules for this fee, which cannot be used if there is no product invoice.
Please refer to the “how to” on ESC uses.
Viewing fees in DDS Shipper
Provisions criteria / Provisions list / Invoice / Fees
After these settings have been implemented, these fees will appear in the list of available fees on the Web screen.
Open an invoice
Open the fees tab
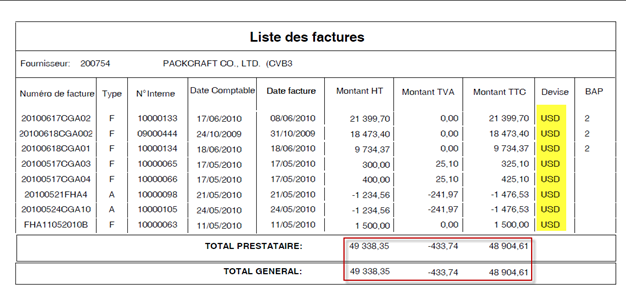
The invoice fee list is displayed.
Open fee pop-up window
Click on magnifying glass icon to open the fee search pop-up window
Managing discrepancies
Back Office / Maintenance / Agencies / Invoices-accounting tab
Allowing a discrepancy and defining the related management rule
Open agency list
Open “Invoice/Accounting” tab of relevant agency
Allow discrepancies
In the “Discrepancies management” block check the “Goods Suppliers” box.
If the “Blocking control" box is checked, the system will forbid reconciliation if the amount on the supplier invoice is different from that of the goods provisions.
Setting a discrepancy amount
Select “Difference amount accepted” box
Specify amount and currency of discrepancy
Save
Example where a maximum (blocking) discrepancy is set at an amount of 1.25 Euro:
We have an amount of EUR 22320 for reconciliation that we convert into USD: 27453.6 (1.23 rate)
With the tolerance configured, the system should allow a PA1 whose amount entered in EUR should be comprised between 22321.25 and 22318.75.
Which means in USD: 27455.1375 and 27452.0625 USD
Setting a discrepancy percentage
Select “Difference pourcent accepted” box
Specify discrepancy percentage
Save
Example where a (non-blocking) discrepancy is set at 0.5%:
We have an amount of HKD 31680 for reconciliation that we convert into EUR: 9504.0950409 (3.3333 rate)
Converted into USD: 9504.0950409 x 1.23 = 11690.0369
If the tolerance percentage is set to 0.05, the system should accept a PA1 with an amount comprised between:
Deleting PA2 for a letter of credit
With the implementation of letters of credit in DDS Shipper, it is possible to forbid reconciliations with “PA2” discrepancy.
Discrepancies can be created for an order only if the settlement method for the order differs from the settlement type declared in Back Office/Maintenance/Agency/Invoice accounting – discrepancy management section
Prerequisite:
Check settlement type “LC" exists
Open list in Back Office / Location and data / General data / Settlement type menu.
Check “LC" code is in list.
Check settlement type “DFT" exists
Open list in Back Office / Location and data / General data / Settlement method menu.
Check “DFT” code exists
Check “LC” type is assigned to “DFT” code
Configuration:
Open “Invoice/Accounting” tab of relevant agency
Check “Discrepancy management for settlement method type” box
Assign “LC” code
If all these conditions are met,
At reconciliation, the system will check the settlement method used.
Allocating internal accounting numbers
Back Office / Maintenance / Agencies / Invoices-accounting tab
The internal accounting number corresponds to the internal invoice number that is generated when a goods invoice is reconciled.
Open “Invoice/Accounting” tab of relevant agency
The formula is configured in the “Goods Accounting” zone.
Define counter reset rate
Either “monthly” or “yearly”
Enter formula
The formula is defined jointly with DDS Logistics at project analysis stage.
Enter “Previous year last number”, in the following cases:
For yearly numbering, numbering for the previous and current periods can be handled concurrently.
Prerequisites:
Make sure you enter the last accounting document numbers of n-1 period in the “Previous year last number" field.
The formula must include the year.
The [SUBSTR(‘@ANNEE@’,3,2)] function will reset the last two digits of the year based on the year of the accounting date that is entered.
Since penalty management generates a penalty number, the same numbering rules will apply.